MULTIPLE CHOICE QUESTION (MCQ)
Introduction
The Multiple Choice Question (MCQ) is one of the most common and effective ways to gather data from respondents. With Chisquares, creating and customizing MCQs is easy and powerful, giving you full control over how options are displayed, how data is collected, and how you can manage the participant experience.
This manual will guide you through the process of setting up and managing Multiple Choice Questions, including how to use additional features such as response limits, option filtering, and using images as response options.
Features of MCQ in Chisquares
- Question Text Input: Create and format the core question prompt.
- Response Options: Define selectable answers manually or dynamically.
- Required Toggle: Make the question mandatory to proceed.
- “Other” Option: Enable an open-text response field.
- Media Attachments: Support for audio, image, or video file uploads.
- Response Shuffling: Rotate or fix option orders to reduce bias.
- Response Limits: Hide options after a predefined number of selections.
- Image-Based Options: Replace text with visual answers and captions.
- Dynamic Sourcing: Import options from files or previous questions.
Basic Setup
1. Enter Question
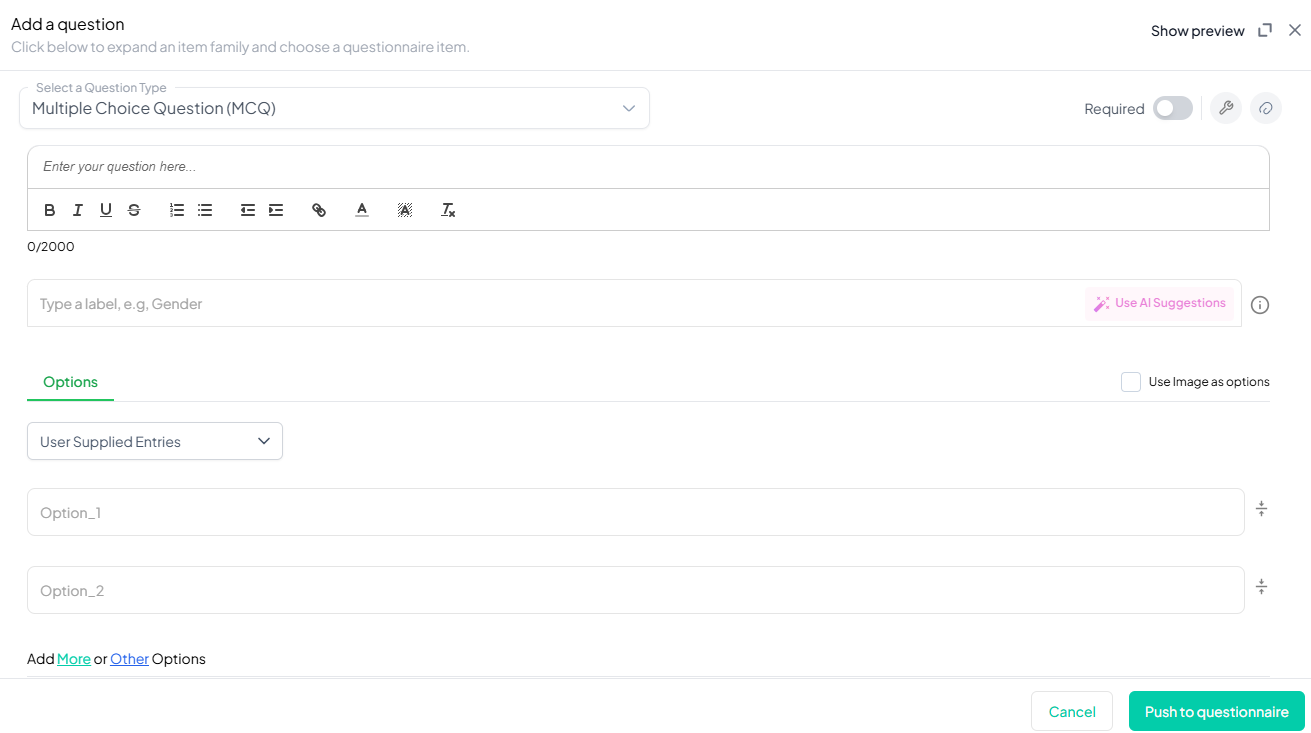
- Type your question using the rich-text editor (bold, italics, hyperlinks, etc.).
2. Label the Question
- Add a label to help identify the question within your survey. Aternatively, you can use AI to get suggestions for the label.
3. Add Answer Options
- Manually input up to 2 default options and add more by clicking More.
- Choose from User Supplied, System Supplied, or Import Options (CSV/JSON/Excel).
4. Mark as Required (Optional)
- Toggle “Required” to make it mandatory.
5. Add Media (Optional)
- Upload an image, video, or audio file (max 4MB) to support the question prompt.
Advanced Features
1. Response Limit per Option
Enable hiding of options after a specified number of responses (e.g., only allow 10 users to select Option A).
2. Response Shuffling
- Choose among:
- Keep all responses fixed
- Shuffle all responses
- Fix some, shuffle others
3. Option Filtering
- Show specific options to specific respondent segments based on earlier answers.
4. Use Image as Options
- Replace text answers with image selections, complete with caption support.
Step-by-Step Guide
Step 1: Create a New Question
To begin creating an MCQ:
- Log into your Chisquares Investigator Portal.
- Navigate to the Survey Design section.
- Click on the Create a New Question button.
Step 2: Select the Question Type
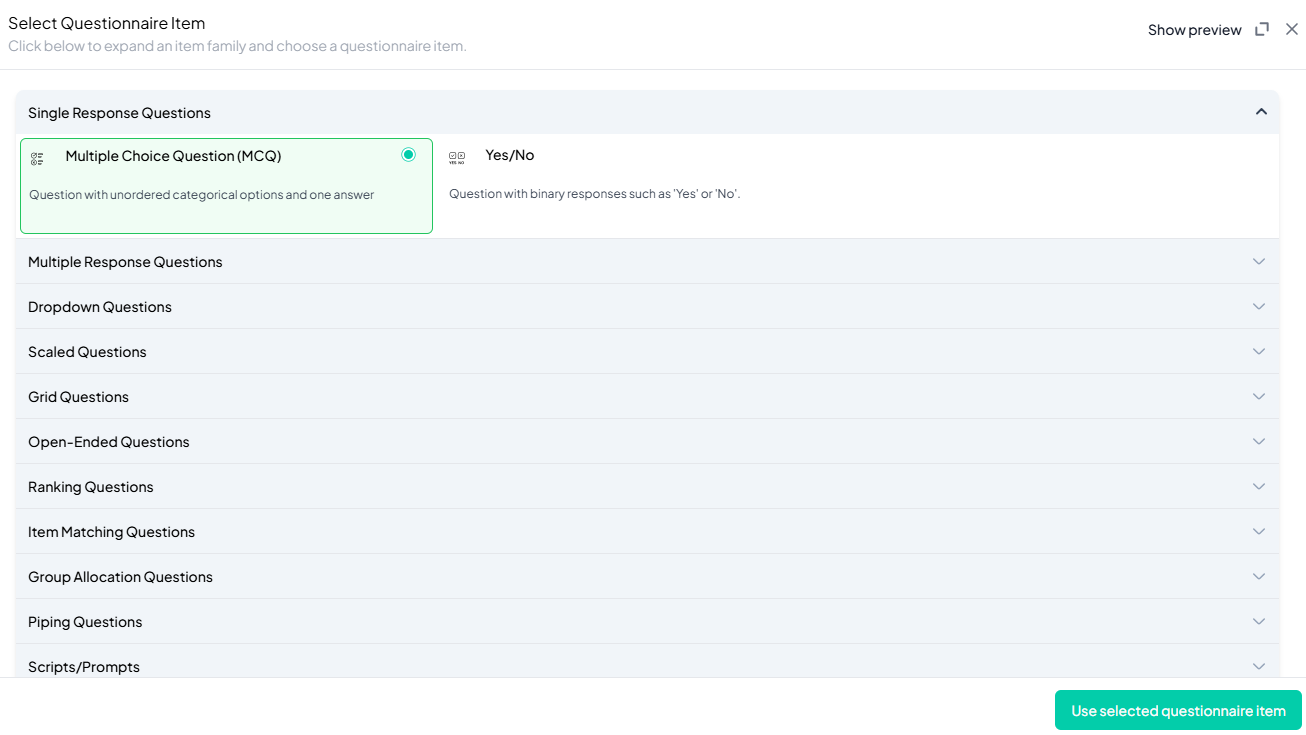
- In the question type section, select Single Response Questions.
- Choose Multiple Choice Questions from the list of available question types.
- Click Use Selected questionnaire item.

Step 3: Add Your Question
- After selecting the MCQ type, you will be prompted to add your question. Enter your question in the provided text box. Example: Which of the following Latin expressions means “For knowledge and sound judgment”?
- Apply formatting using the toolbar.
- You must also add a label to help identify the question within your survey.

Step 4: Define the Response Options
-
Enter the options from which respondents can choose. Each option should represent one unique answer to your question. Example:
- Recte Sapere Fons
- Gradatim Ferociter
- Veni, vidi, vici
- E pluribus unum
- Carpe diem
-
If you want to add additional response options, click More Options and type the new responses.
-
Also, the user can explore system options for responses they do not want to type manually. This is especially useful for very exhaustive options like countries of the world, but the platform contains an extensive array of options you can simply use without having to type options manually (use system-supplied or dynamic entries if needed).
Step 5: Make the Question Required (Optional)
If you want to require participants to answer this question, toggle the Required switch at the top-right of the panel. This ensures respondents cannot proceed without answering the question.
Step 6: Add Media (Optional)
You can upload media (images, videos, or audio files) to accompany the question. Here’s how:
- Click the paperclip icon at the top-right of the panel.
- Upload your media file (must be under 4MB).
- Once uploaded, choose the alignment for the media (left, right, or center). The default text overlay will say, “View the media below, then answer the following question.”
Step 7: Set Response Limits (Optional)
If you want to limit the number of responses for a particular option, follow these steps:
- Click the response limit icon (next to Required toggle).
- Enable Hide specific options after X responses.
- Enter a response cap for each option(e.g., 50). Once this limit is reached, the option will no longer be displayed to participants.
Step 8: Use Option Filtering (Optional)
Option filtering allows you to conditionally display a subset of response options to certain groups of respondents based on their answers to previous questions.
- Click the Option Filtering button.
- Select the question(s) you want to use to define the subset of respondents.
- Choose the conditions for filtering (e.g., participants aged 18-30).
- Select the options that should be shown to this subset of respondents.
- Respondents who meet the condition will only see the filtered options. All others will see the full list of options.
Step 9: Use Images as Options (Optional)
- If you prefer to use images as response options instead of text, check the Use Images as Options box.
- Upload images for each option and add captions as necessary.
Rotation Options
Chisquares offers several rotation options for MCQs to minimize bias in responses. You can manage these settings from the question setup page:
- Keep All Responses Fixed: All participants will see the options in the same order.
- Rotate All Responses: The order of options is randomized for each participant.
- Fix Some, Rotate Others: Select a few options to remain fixed in their order, while the others rotate.
How to Set Rotation
- Click on the Rotation Options.
- Choose the desired rotation behavior.
- Save your settings.
Preview Mode
Before finalizing the MCQ question, it’s important to preview how it will appear to participants.
- Click the Preview button to see the question as participants will view it.
- Make sure all options, media, and settings look as expected.
Final Step: Push to Questionnaire
Once you are satisfied with your MCQ setup:
- Click Push to Questionnaire to add the question to your live survey.
- If you need to make edits later, you can always return to the question editor to make changes.
Example Question Setup
Question:
Which of the following Latin expressions means “For knowledge and sound judgment”?
Response Options:
- Recte Sapere Fons
- Gradatim Ferociter
- Veni, vidi, vici
- E pluribus unum
- Carpe diem
Additional Settings:
- Required: Yes
- Response Limit: 50 for “Recte Sapere Fons”
- Option Filtering: Show “Recte Sapere Fons” only to respondents who answered “Yes” to the question Have you ever studied Latin?
- Use Images as Options: Uploaded an image of the Latin text with captions.
- Add Section Header (Optional): Toggle this switch to add a section header to the question for context or grouping.
- Add Footer Prompt (Optional): Toggle this switch to include a closing note or prompt at the bottom of the question.
Conclusion
The Multiple Choice Question (MCQ) feature on Chisquares is an essential tool for gathering clear, structured responses from survey participants. Whether you are conducting an educational assessment, market research, or any other type of survey, Chisquares offers a variety of powerful features like response limits, option filtering, and image-based responses to enhance the survey experience for both respondents and researchers.
To watch a video of this question being set up, click the link below: link
